Networking RISC OS Computers to WindowsXP
Article by Paul Vigay
I have set this page up as a simple set of instructions to help people link their RISC OS machines via an Ethernet card to a PC running WindowsXP and be able to access PC files from the Acorn using !Omniclient or LanMan98.
I haven't really experimented that much (mainly because I tend to use Wintel machines as little as possible) so the instructions provided here are pretty much an exact account of how I setup my machines here, and may not necessarily work if you change too many settings. However, I have tried to give additional instructions and comments were suitable, and you are more then welcome to contact me in the case of specific difficulties and I will try to help wherever possible.
Information available on this page;
Starting off
In order to try to stem the migration of schools from RISC OS based computers to inferior PC computers, I am prepared to offer free RISC OS networking advice and support to any Schools using RISC OS computers. I do not give PC support.
These instructions assume that you have an up-to-date !Boot sequence on your machine. This will be the case if you're using RISC OS 4 or above. If you're using RISC OS 3, you should ensure that you have installed the universal !Boot sequence on the RISC OS machines.
Configuring the Acorn TCP/IP stuff
Firstly, configure the networking on the RISC OS machines. We have some links to how to do this for various versions of RISC OS on our networking index page.
Once you've configured the RISC OS machine, you need to configure Windows XP so that you can talk to it from RISC OS and access shared files stored on the PC drive. After that we will then return to the Acorn to setup and configure Omniclient/LanMan98 to talk to the PC.
 The first thing you should do is to assign each of your computers an easy to remember name - such as planets of the Solar System or characters from your favourite movie or book. This is so that you can setup a hosts file mapping names to the actual IP addresses of your machines. I've named my own machines after Arthurian legends, Tolkien or Harry Potter characters.
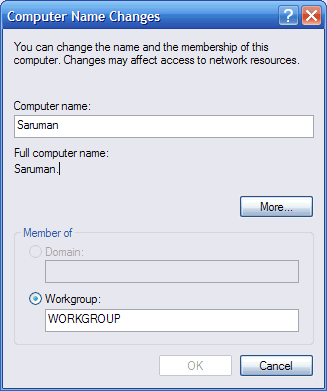
My PC is called Saruman, so to set a name for your Windows machine, follow the steps below;
1. Open the Control Panel from the start menu.
2. Double-click on the System icon to display the System Properties.
3. Click on the Computer Name tab at the top of the window. This will display the name and (optional) description of your computer.
4. Click on the Change button. This will allow you to edit the computer name and workgroup.
5. Enter a suitable name for the computer (I entered Saruman here), and also a suitable workgroup name. The workgroup name is usually designed for offices which have clusters of computers, so that you can name certain 'groups' of computers. I just entered HOME here, or you can leave it as WORKGROUP. This is only really relevant if you are likely to be using other Windows computers to browse your Network Neighbourhood.
6. Click OK to activate the names and return to the System Properties window. Under some circumstances, Windows may ask you to restart the computer at this stage.
7. Now click OK again and the name change will take effect.
I'm assuming here that you've correctly installed your network card from a hardware point of view. The following instructions will refer to setting up Windows XP for communication between other PCs or RISC OS machines on your local network.
These instructions also assume that you're using a wired connection, but they should work equally well if you're using wireless - just edit the Wireless Network Connection rather than the Local Area Connection (fig.1).

1. Turn on the PC and wait for it to load up Windows, then open the Control Panel again.
2. Double-click on Network Connections and this should open a window containing a Local Area Connection icon.
3. Right-click on the Local Area Connection icon and select Properties. This should open a window containing a list of current network connections.
4. Make sure your ethernet card is listed as the default Connect using .... in the top part of the window. Add it if it isn't.
5. Go down to Internet Protocol (TCP/IP) and double-click on it to open the TCP/IP properties. The default screen should display IP addresses.
6. Make sure the 'Use the following IP address' icon is selected and enter a unique IP address.
I've setup all my home machines on a 10.1.1.x network, so my PC is defined an IP address of 10.1.1.60 which is what I entered into the IP Address box. See our guide to IP addresses though.
7. Enter 255.255.255.0 in the Subnet Mask box. This has to be the same as the Netmask you configured on the RISC OS TCP/IP settings.
8. If you access the internet on this computer through a broadband router, you want to enter the IP addresses of your ISPs name servers in the two boxes provided at the bottom, and tick the 'Use the following DNS server addresses' option.
9. Now click on the Advanced button at the bottom of the window and then the 'WINS Configuration' tab at the top of the subsequent window. Ensure that the WINS Resolution is 'disabled' (ie. the WINS addresses box is empty).
10. At the bottom of the WINS panel, I've set my NetBIOS setting to Enable NetBIOS over TCP/IP as I don't use DHCP.
11. Click on the 'DNS' tab and make you've entered your ISP name server IP addresses, if you have an internet collection. Leave all the other options to their default values.
12. Now click OK at the bottom of the Advanced TCP/IP Settings window and then 'OK' at the bottom of the Internet Protocol (TCP/IP) Properties window, as your TCP/IP settings are now configured.
In theory you can skip the following bit, just coming back here if you find that you can't connect using the settings so far.
| |
13. You should now be back to the original Local Area Connection Properties window. Now click on the Advanced tag at the top of the window. This will open the Internet Connection Firewall configuration panel.
If you have AVG Internet Security, click here to read our instructions on configuring the firewall for Omniclient access.
14. For maximum security you really want the firewall enabled, so make sure the Protect my computer... option is ticked. Then click on the Settings button at the bottom of the window. This will open the firewall settings window.
15. A rather complicated list of Services should be listed, and if this is a new WindowsXP installation, they will probably all be unticked (off). At this precise moment, everything will be disabled and Omniclient/LanMan won't be able to connect to the PC. To rectify this we need to add a couple of new services to the WindowsXP firewall.
16. Click Add and a blank Service Settings window will open. This requires four parameters to be added.
17. In the Description of service box, enter netbios-ns
18. In the Name or IP address of computer hosting this service box, enter the IP address of your RISC OS machine which will be running Omniclient.
19. In the External Port number for this service box, enter 137 and ensure the UDP button is ticked.
20. In the Internal Port number for this service box, enter 137
21. Click 'OK' to create this new service. You now need to repeat the process for the other service required for Omniclient/LanMan to function correctly.
22. Click 'Add' and a blank 'Service Settings' window will open again.
23. In the Description of service box, enter netbios-ssn
24. In the Name or IP address of computer hosting this service box, enter the IP address of your RISC OS machine which will be running Omniclient.
25. In the External Port number for this service box, enter 139 and ensure the TCP button is ticked.
26. In the Internal Port number for this service box, enter 139
27. Click 'OK' to create this new service. This should now have created the two services you require for Omniclient/LanMan to function correctly.
|
|
Before you can load !OmniClient on the Acorn you need some files or directories to access on the PC, because by default none of the directories are shared. !OmniClient will only look at remote resources that have been shared, so we might as well do this now before we load up !OmniClient.
Although you can share files or directories, I think it is easier to just share directories. After all, if you share a 'temp' directory then any files within it automatically inherit the same share settings as the parent directory.
1. This is actually dead simple. Just click on a file or directory in your file explorer window and click the right hand mouse button. A menu should open giving you various options. One of them should be Sharing and Security.... Click on it.
2. At the top of the resulting window there should be two tabs. Click on Sharing. In the bottom half of the window you should have a Network Sharing and Security section with a tick box. This is probably unticked at the moment.
3. To share the file/directory you need to tick the box and enter a name for the share. I tend to just enter the same name as the original file or directory. This tends to simplify matters and save confusion over conflicting names etc. I'd also avoid using spaces as this can confuse Omniclient/LanMan.
 4. Click 'OK' to activate the sharing settings. You should find that your file/directory now has a little hand icon on it. This is Windows' way of saying that the object is shared.
To access the various files or directories that you shared on the PC you will need to be running OmniClient on the Acorn. OmniClient was provided by Acorn on the Browse or Java CDs produced by Acorn (inside the $.DISTRIB.NET.Network directory). If you don't have either of these CDs you will need to buy OmniClient seperately. In either case, consult your local Acorn dealer.
1. If this is the first time you've installed Omniclient, firstly double-click on !OmniSetup.
2. You should ensure that two filing systems are installed (ie. ticked). These are Lan Manager (Windows) and Acorn Access. When selecting Lan Manager (Windows) also ensure that the transport mechanism is set to TCP/IP rather than NetBEUI.
3. Set the other options to your personal favourites and click 'Save'.
4. You can now load OmniClient. Indeed, in future you can jump straight to this step because !OmniSetup only needs to be run once - unless you wish to change the settings.
5. OmniClient will appear on the left hand side of the icon bar. Do not click SELECT on it, but click MENU over it's icon. This will give the Omni menu and you can move right from 'Mounts' to see a sub-menu.
 6. The first time OmniClient is run you will only see two options; Save mounts and Protocols. The following procedure should be followed for each file or directory you wish to access on the PC. If accessing the PC via OmniClient I would recommend only sharing directories on the PC.
7. Move right from 'Protocols' to open the Protocols sub-menu. This has one item for each of the file systems that you configured earlier using OmniSetup. You should see 'LAN Manager' and 'Acorn Access' listed. To open a PC share you will need LAN Manager. Click on it now.
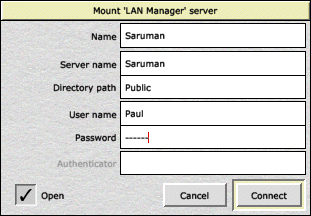
8. This will open a "Mount 'LAN Manager' server" window containing a number of writable icons...
9. For 'Name' and 'Directory path' enter the name of a shared directory on the PC. For example if you shared your c:\Temp directory and called it "TEMP", then enter "TEMP" for both of these fields. The name entered should be the same as that given at step 3 of the 'Sharing stuff on the PC' section above.
N.B.The 'Name' icon can actually be set to anything because this is the name OmniClient will call the icon on the iconbar, but I tend to set to the same as the shared directory to cut down on confusion.
10. In the 'Server name' icon, enter the name you called the PC (see the Naming your PC section [step 5] above) - in my case "Lancelot".
11. The other icons can all be left blank (unless you password protected your shared directory on the PC - step 6 in the 'Sharing stuff on the PC' section above - in which case you will also need to enter the password in the 'Password' field.
12. Click 'Connect' and if all is well there should be a short delay and then OmniClient should open the shared disc on the PC in a normal Acorn filer type display. You will also find that the OmniClient icon on the iconbar will change to the name you entered in 9.
13. The directory you shared has now effectively become the root directory on a new filing system (disc drive) which OmniClient has become. If you now go back to step 5 and create another mount for another shared directory you will find that OmniClient adds a new icon (each with it's own relevant name) for each shared object.
14. If you want OmniClient to keep all your 'Mount' information for the next time you use OmniClient you should click on 'Mounts->Save mounts' on the OmniClient menu.
15. To dismount (and thus close) an open mount, simply click on 'Dismount' on the OmniClient menu.
· LanMan98 from Warm Silence Software that integrates with OmniClient and allows you to access the long file names of Win95/Win98/NT.
· The RISC OS Samba server that allows the PC to see the RISC OS file system. This is available to download from http://www.merddin.demon.co.uk/riscos.html
Other links to networking info:-
· Ian Jeffray's Networking Instructions
· Comp.sys.acorn.networking FAQ
· Richard Murray's Networking page
Add a comment to this article
If you wish to add a comment to this article, please use the form below. Please note that by submitting comments using this form you are allowing all of the information submitted to be visible on this website. Your comment will be published immediately, so please proof-read before you add. Any comments deemed to be abusive or irrelevant to the topic of the article may be removed without warning.