
It is relatively easy to connect a RISC OS computer and an Apple Mac together so that you can transfer files back and forth between them. I have experience of networking both Mac OS 9 and Mac OS X machines together. However, these instructions assume you have upgraded to Mac OS X.
If there is enough demand I may write an article explaining how to network Mac OS 9 to RISC OS, but Mac OS 9 is gradually being phased out, so I've decided to concentrate on OS X.
These instructions assume that you are using Mac OS 10.4 (Tiger) but they should be fairly generic. However, if you have the latest version of OS X, then I've written some specific Leopard instructions.
Both machines should be linked via ethernet and both machines should be running TCP/IP which is the standard protocol for communicating via a local area network (LAN).
For the process of transferring files back and forth, I've found that the easiest way of obtaining this is to send files via FTP from the RISC OS end. This effectively means running an FTP server on the Mac and using an FTP client on the RISC OS computer in order to transfer the files.
Mac OS X has everything you require built-in as standard. On the RISC OS computer you will require an FTP client, for which I recommend Colin Granville's FTPc application which is free and available to download from http://ftpc.iconbar.com
1. Configure the RISC OS machines via my RISC OS TCP/IP configuration page.
We will now look at configuring Mac OS X so that we can run FTPc on the RISC OS machine and connect to the Apple.
Everything you need to do to setup Mac OS X to talk via TCP/IP can be controlled via the 'System Preferences' Internet & Network settings.
1. Load the System Preferences by clicking on the switch icon on the Dock bar (see below)
This will load the System preferences and display the various configuration options. Click on Network. A complicated looking window will open displaying a location and various technical looking settings.
2. First off you want to create a location for your settings. This allows you to easily switch locations, which is more useful if you have a Mac laptop and may want to connect to different networks, but even if you only use your Mac at one location it's worth creating a specific location for your settings. Click on the Location icon and a pull down menu will open. Select New Location...
3. You will be presented with an entry box so that you can name your new location. Call it Home (LAN) or something and click OK.
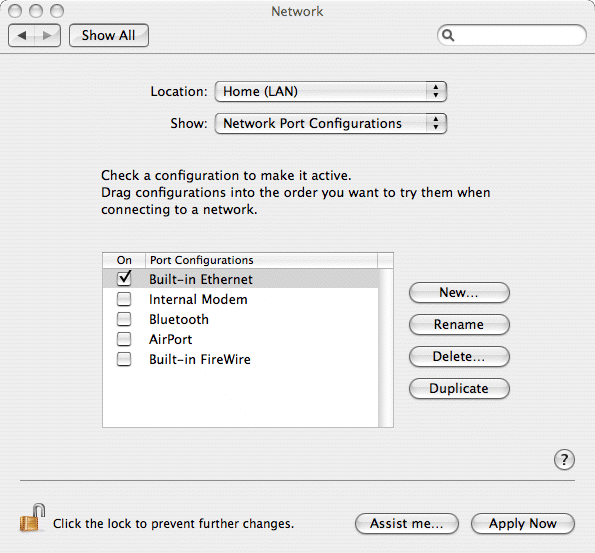
4. Underneath the Location panel is another panel saying which settings are being shown. This will generally be IrDA Modem Port, Internal Modem or Built-in Ethernet (depending upon the hardware installed in your Mac). Click on the Show pull down menu and select the 'Network Port Configurations' option.
5. Each interface that is installed in your computer will have an on/off tickbox. Simply go through each one disabling ones that aren't used, or you don't with to configure in this location. You need to ensure that the Built-in Ethernet one is turned ON though (ticked).
6. Once you've configured your interfaces, return to the Show menu and select the Built-in Ethernet option. This will display the TCP/IP options in the main part of the window (see below)
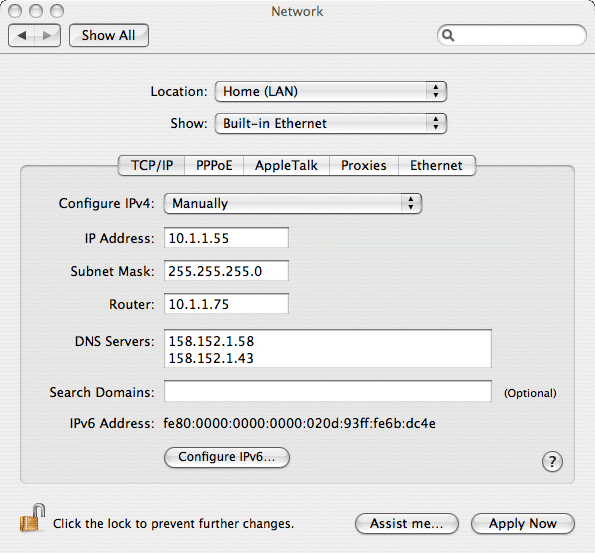
7. Ensure the TCP/IP tag is selected (you don't need to worry about the other tabs at this point) and click on the Configure drop down menu.
8. Select the Manually option.
9. Now enter the IP address you require for your computer in the IP Address box. This should be something like 10.1.1.55 ensuring that the first three numbers are the same as those configured for your RISC OS computer. The fourth number should be unique within your network.
10. Enter 255.255.255.0 in the Subnet Mask box.
11. You can leave all the other boxes blank - unless you have a router or want to setup a more complex network - in which case they should be set to your ISPs name server values.
12. Click Apply Now to set the options and save for future use. At any point, these settings can be set, simply by selecting your relevant location from the Location submenu on the main Apple menu (very top left of the screen).
Once you've configured all your TCP/IP settings, you need to ensure that your Mac computer allows other people to connect via FTP. This is because Mac OS X has a built-in firewall, which can prevent connections from other computers.
Still in the System Preferences window, click on the Sharing icon and you should see a window containing three tags; Services, Firewall and Internet. Ensure the Services tag is selected.
Within this tag you should see a service called FTP Access. Make sure this option is ticked, and it will enable other computers to connect via FTP.
You can now close the System Preferences window as your Apple Mac should be correctly setup to allow file transfer via FTP.
There are two ways of accessing the Apple Mac harddrive from the RISC OS computer; FTP (the easiest and more compatible) and AppleTalk (if you've got RISC OS Select or Adjust)
Load FTPc on the RISC OS computer and click Select on the FTPc icon. It should open a connection window.
You only need to enter three values in this window in order to connect to the Apple Mac. Enter the IP address of the Mac in the Host box. If you've used the values I've recommended above, this will be 10.1.1.55
Leave the Path blank, and enter a Mac OS X username into the User box.
The Mac OS X username will either be a user you've created on the Mac, or (if you haven't created any users) the administrator user that you entered when you very first purchased your Mac, or installed Mac OS X.
Enter the relevant password into the Password box.
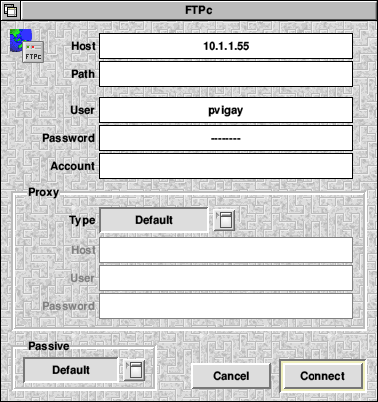
You should now be able to click 'Connect' and if all is well, a window will open containing the Home directory of the Mac OS user you've just logged in as.
You can now drag files back and forth using the usual RISC OS drag and drop method.
1. If you have OmniClient or LanMan, you can also connect to Apple Macs via 'file sharing'. Before you do this, you have to ensure that file sharing is enabled on the Mac. To check this, load the System Preferences and click on Sharing. Make sure Windows Sharing is enabled by ticking the option.
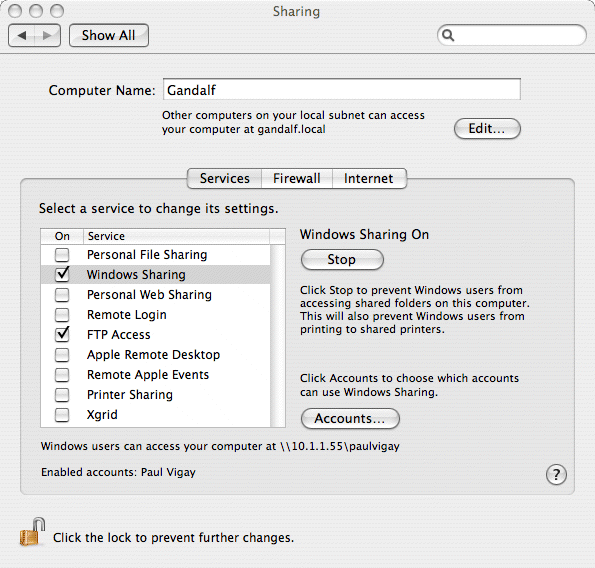
This will set the relevant firewall rules on the Mac and enable the file share server.
Once you've configured the Mac you're ready to start the connection from the RISC OS machine. To do this you will require a copy of !OmniClient along with the LanMan module (supplied with newer versions of RISC OS). Load !Omni and click MENU over it's icon. Navigate the menus to open the Mounts->Protocols->Lan Manager.
2. Fill in the relevant details as per the screenshot below;
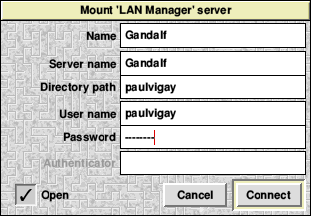
3. Enter the name you want to call this 'mount' - can be pretty much what you want and will identify the remote computer on your iconbar. Call it Mac or in my case, Gandalf which is the network name of my Mac.
4. Enter the Server name which should be the name of your remote computer. This is shown in the Apple Sharing configuration window (see above).
5. Enter the Directory path which should be the name of the user you want to connect to on the Mac. If you're unsure, to to the System Configuration on the Mac and examine the System - Accounts settings.
6. Enter the User name which should be the name of the user you want to connect to on the Mac. Generally, this will be the same as the directory path unless you've modified the directory path to connect to a sub-directory on the Mac.
7. Lastly, enter the Password which is the relevant user password on the Mac.
8. Click Connect and if all is well you should get a shared disc icon appear on the iconbar after a few seconds.

Clicking on the shared disc icon should open a standard looking filer window containing all the files on the remote (Apple Mac) computer and you can copy files in the normal RISC OS drag 'n' drop manner.
I hope this article is of use to you, but please feel free to contact me if you can't understand any part of these instructions, or if you feel that anything could be explained a bit better.
|
Last edit: 10th Apr 2016 at 4:55pm (3502 days ago) |
|
| ||||||||||
|
| ||||||||||||||||||||