These instructions assume that you have installed RISC OS Select on the RISC OS machine. Once you've configured Select, you should return to my previous article for details on how to configure standard RISC OS.
| 1. | Firstly, make yourself a nice cup of tea and sit down in front of the RISC OS computer. I've assumed that you may have one or more RISC OS computers that you wish to network, so just follow these instructions for each machine, simply changing the relevant IP address and machine names. Once you've configured RISC OS you can then set about configuring any Apple Mac's or PCs you wish to connect. |
| 2. | Double-click on !Boot to load the configuration setup. |
| 3. | Click on Network. This should open a Network configuration window containing several icons (see fig.1).
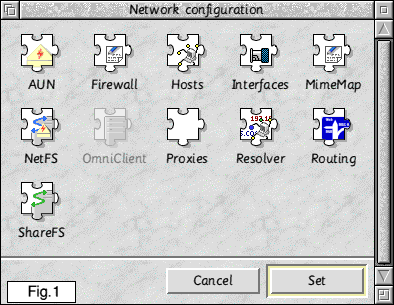 |
| 4. | Click on the AUN icon and make sure the 'Enable AUN' icon is turned off (ie. no tick) and click 'Set'. |
| 5. | Click on the NetFS icon and make sure 'Use NetFS and NetPrint' is ticked OFF. Click 'Set'. |
| 6. | Click on the ShareFS icon and make sure 'Enable ShareFS' is ticked ON. Click 'Set'. This is required if you have other RISC OS machines and wish to share the hard drives via the 'Discs' icon on the iconbar. |
| 7. | Now click on the Resolver icon. This opens a 'Resolver and host name' window containing a number of writable icons. |
| 8. | In the 'Host name' icon enter a name by which your computer will be known on your network. This can be an English name that you can remember. I've called my RPC "Arthur" because I'm a bit of an Arthurian legends fan! Another sensible option would be names of the Solar System planets or something else. Each computer on your network needs a unique name. |
| 9. | For the Local domain enter ".nom"
I'm not sure exactly why this is, but a PC owning friend recommended this and who am I to argue with a PC user! |
| 10. | The Primary name server should be left blank if you're only networking local machines together. However, if you plan to connect to the internet from this machine, enter the primary name server of your ISP. In the case of Demon, this is 158.152.1.58 - but you'll need to check with your own ISP for the correct value. |
| 11. | The Secondary name server should again be left blank if you're only networking local machines together, but set to the secondary name server of your ISP if you wish to access the internet from this machine. Again, you'll need to check with your ISP for this value. |
| 12. | The Tertiary name server can be left blank, irrespective. |
| 13. | Make the sure the 'Act as a DNS name server' option at the bottom is unticked. |
| 14. | Now click 'Set'. |
| 15. | Now click Routing in the Network configuration window. This doesn't need to be used in a simple network, so you can just confirm that the Gateway icon is blank and all the options are turned off. Click 'Set' to close the window. If you're using broadband, you should enter the IP address of your router here. If connecting to a LAN, the IP address of the gateway machine, which you can obtain from your network administrator. |
| 16. | Click on the 'Hosts' icon. This will list all the names of computers on your network. Add or remove any as required. This is not essential but allows you to refer to other machines on your local network by name rather than by IP address. Make sure there is at least the following entry;
127.0.0.1 loopback |
| | Add the other machines to the list, such that it might look something like the following (text in green are comments for the purposes of these instructions - do not actually enter this).
10.1.1.10      gandalf     gandalf is the computer with IP 10.1.1.10
10.1.1.11      voldemort   voldemort might be the name you call a PC

Bear in mind that your IP addresses may be in the range 192.168.0.x or whatever,
depending upon what you've chosen as your subnet.
|
| 17. | Save any updated host information and close the Hosts database window. |
| 18. | Click on the Interfaces icon. This will open the Interfaces window and you should find that your relevant network card is ticked. In my case it says "I-cubed EtherLAN600" but yours might be different. At this stage, you can set the 'Auto-configure' icon to None via the menu. |
| 19. | Click on the Configure icon (to the right) and a network card configuration window should open. |
| 20. | You need to enter an IP address in the relevant icon. This should be unique for each machine on your network. If running a home network I would recommend starting it with 10.1.1.x where x can be pretty much any number you like, between 1 and 255. I've set my RPC to 10.1.1.51
If you're configuring a router for broadband access, you need to ensure that the IP address is in the same IP range as your router - see my broadband instructions for more information. |
| 21. | Set the Netmask to 255.255.255.0 |
| 22. | Underneath these two icons there should be a box labelled 'Obtain IP address' and around six selectable icons. Make sure the one labelled 'Manually' is ticked and all the others are off. |
| 23. | Ensure that the 'Primary interface' icon is ticked, although you'll possibly find this is greyed out anyway. |
| 24. | Click 'Set'.
N.B. The settings described above are ones that I've chosen that work ok on my network. Obviosuly if you are planning complex network setup's or gateways to other networks, some settings may need to be different. However, if you are setting up extensive networks (as opposed to getting a simple network talking between a RISC OS machine and a PC) I would recommend getting a book on TCP/IP addressing, which explains what all the various Netmasks, IP addresses and other terminology mean. If you just follow these instructions you should be able to get a simple network up and running without too much trouble. |
| 25. | Having clicked 'Set', click 'Set' on the Interfaces window. At this point, you will be asked to reset the machine for the changes to take place. I'd advise clicking on 'Reset now' which should apply all the changes to your configuration. |
| 26. | Reset the machine and the RISC OS TCP/IP side of things is now set up correctly. |
| 27. | You can repeat the steps above for each RISC OS machine on your network. |
If you wish to add a comment to this article, please use the form below. Please note that by submitting comments using this form you are allowing all of the information submitted to be visible on this website. Your comment will be published immediately, so please proof-read before you add. Any comments deemed to be abusive or irrelevant to the topic of the article may be removed without warning.